Instructions for Adding the Copyroom Printer
Windows 7
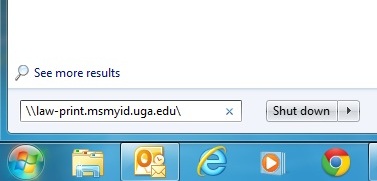
1. Click the Windows button and type: \\law-print.msmyid.uga.edu\ as seen below
3. Provide your MYID username and password (NOTE: for username enter in this format: "MYID\yourMYID")
4. Make sure to select "Remember my Credentials"
5. Right click on "copyroom" and choose "Connect"
Windows 8
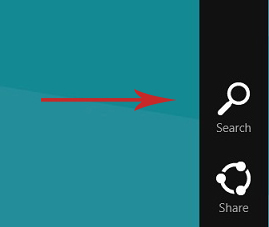
1. From the desktop or the metro interface move the mouse to the upper right hand corner of the screen to open the "Charms" menu
2. Click on the "Search" function
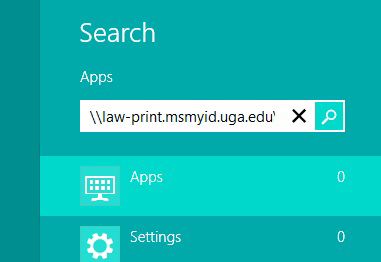
3. In the search box type: \\law-print.msmyid.uga.edu\ as seen below and hit return
4. Provide your MYID username and password (NOTE: for username enter in this format: "MYID\yourMYID")
5. Make sure to select "Remember my Credentials"
6. Right click on "copyroom" and choose "Connect"
Windows XP
1. Go to the start menu and click Printers and Faxes
2. Select "Add a Printer"
3. Click "Next" on the add a printer wizard
4. Select "Add a Network Printer"
5. Click "Connect to this printer" and type "\\law-print.msmyid.uga.edu\copyroom", then click "Next"
6. A box will appear asking for your MYID username and password (NOTE: for username enter in this format: "MYID\yourMYID"). Make sure to check the box to remember your password, then click OK
7. You can then choose if this will be your default printer, then press next until the wizard closes
Instructions for Adding the Annex Lab Printers
Printer Name Chart
| Printer | Name | Driver * |
| Law Library Annex Lab | \\128.192.124.151\annexlab | hp LaserJet 9040 |
| Annex Lab Color Printer | \\128.192.124.151\annexlabcolor | hp LaserJet 5550 |
* The driver is listed if you would like to install your own version of the print driver. The latest HP driver download can be found here
If you are using VISTA or WINDOWS 7 you will need to determine which version you have installed (64-bit or 32-bit). You can find this by going to the Control Panel and clicking on System and Security, then System.
WINDOWS 64-bit VISTA or 64-bit WINDOWS 7
1. Make sure you have signed into the wireless network PAWS
2. Go to the control panel and select Printer under "Hardware and Sound" In Classic View it may be listed just as "Printers"
3. Once you see your printer list Select "Add a Printer"
4. Choose "Add a Local Printer"
5. The Default in the drop down box is "Local Port". Do not change that. Click "Next"
6. A dialog box will ask you to enter a port name. This will be a Printer Name as decribed in the chart above: (example: \\128.192.59.17\copyroom)
11. It should select the driver for you. If it doesn't, you can select the appropriate driver from the chart
12. Finish the installation
WINDOWS 32-bit VISTA or 32-bit WINDOWS 7:
1. First make sure you have logged into the PAWS wireless network through a browser.
2. Go to the Control Panel and select Printer under "Hardware and Sound". In Classic View it may be listed just as "Printers"
3. Once you see your printer list Select "Add a Printer"
4. Choose "Network Printer" button
5. Click the "Stop" button to stop the wizard from scanning for network printers
6. Select "The printer that I want isn't listed"
7. Click OK and the install will proceed automatically
8. Select the "shared printer by name" box
9. Fill in the Printer Name you wish to install by using the chart above: (example: \\128.192.59.17\copyroom)
10. Select "Next"
11. It should select the driver for you. If it doesn't, you can select the appropriate driver from the chart
12. Finish the installation
WINDOWS XP:
1. Make sure you have signed into the wireless network PAWS-Secure.
2. Open your Printers list.(Click on Start and then select Printers and Faxes)
3. Once the Printer and Faxes window opens, select File and Add Printer.
4. The Add Printer Wizard window should open. Select Next.
5. Select A Network Printer... radio button and click Next.
6. Select the 2nd radio button Connect to this Printer..
7. Fill in the Printer Name you wish to install by using the chart below: (example \\128.192.59.17\copyroom)
8. Once you have filled out the Printer name, click Next. A pop-up window will appear asking if you are sure you want to connect. Select Yes.
9. Then decide if you would like this printer to be your default printer and select Next then Finish.
10. You may now print to the newly installed print queue from any application.
Printer Name Chart
| Printer | Name | Driver * |
| Law Library Annex Lab | \\128.192.124.151\annexlab | hp LaserJet 9040 |
| Annex Lab Color Printer | \\128.192.124.151\annexlabcolor | hp LaserJet 5550 |
* The driver is listed if you would like to install your own version of the print driver. The HP driver download can be found here
---If you have any trouble/questions. Please feel free to call us 706-542-0895 or stop by and we'll take a look